General description
The medical device is a Class I medical device.
Intended Use
This product is an augmented reality (AR) headset equipped with a 3D viewer and two cameras to provide stereoscopic, real-time viewing of the area magnified by the lenses. The 3D viewing glasses of the headset capture real-time images of the viewing area and, in addition to displaying them on the 3D glasses, they can store them on the console or transmit them in real time via a standard communication channel to other computers or devices, facilitating procedures for the doctors performing them. The device enables dentists not only to understand and perform procedures in the best possible way but especially to do so without needing to tilt or move their head, eliminating or greatly reducing musculoskeletal problems in the back and neck.
Medical Device Classification
Orisview facilitates the use of other medical devices, meaning it is a medical device that supports achieving the purpose of medical devices.
User
The product must be used only by professional medical personnel fully familiar with the manual. Patient population: not specified
Contraindications
Use the device according to the manual’s instructions. Do not connect the product’s USB-C ports to uncertified equipment or power supplies. This device does not come into contact with the patient and is not a chemical, biological, or blood-related device. It has no side effects.
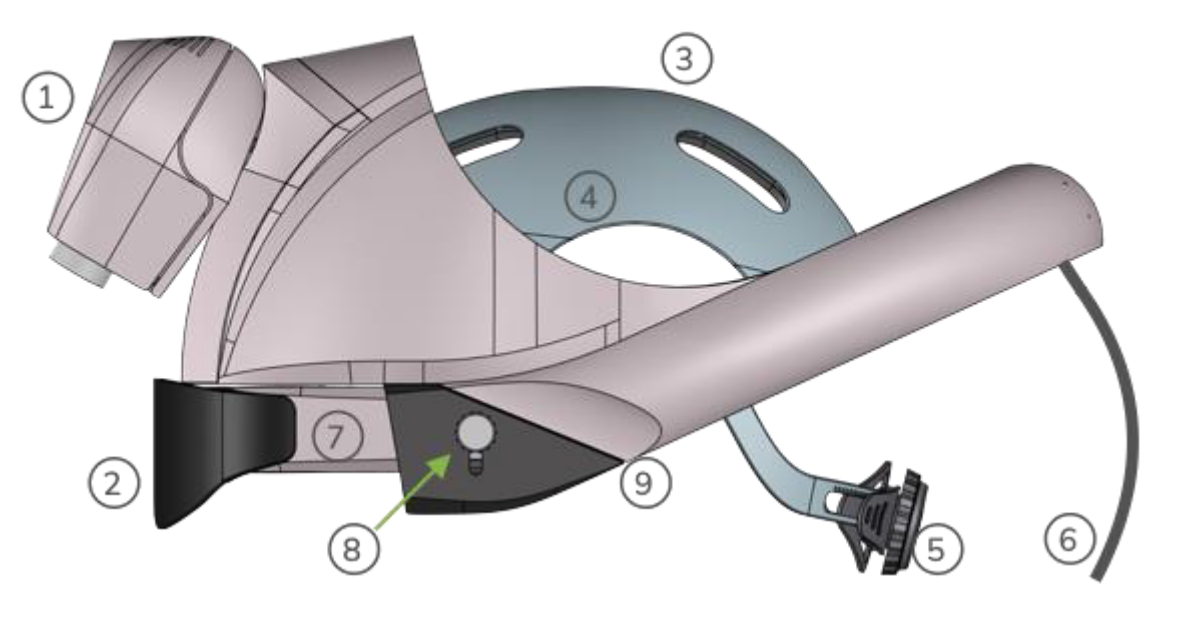
Orisview Headset
| Group | Name | Description |
|---|---|---|
| 1 | 3D Camera Group | Group containing the two cameras for 3D vision and two LED spotlights (white and yellow) to adequately illuminate the focused working area |
| 2 | Shade | The magnetically attached shade can be of two types: passive or active. It increases display clarity by reducing perceived ambient light levels |
| 3 | Head Cap | The head cap is the part of the headset that fits snugly on the head and houses the pads for fine adjustment of the fit on the operator’s head. Inside the cap, two Velcro pads (top and side) are inserted and chosen based on the operator’s head circumference. Pads should be replaced depending on usage frequency |
| 4 | Head Pads | Velcro pads installed under the head cap (top and side). Available in 4 sizes (S, M, L, XL) to better fit the user’s head. Should be replaced based on usage frequency |
| 5 | Head Cap Tightening Knob | Device to lock the headset on the operator’s head. Turn clockwise to tighten, counterclockwise to loosen |
| 6 | Cable for Connecting to Control Console | Cable to connect the headset to the control console. Equipped with a special connector with retention system to prevent accidental disconnections |
| 7 | Augmented Reality 3D Viewing Group | 3D AR viewing system where the cameras’ images are projected in real time. The AR glasses provide stereoscopic vision of the focused area. The 3D viewing group can slide forward to allow wearing the headset with prescription glasses |
| 8 | Up/Down Adjustment Knob | The headset has two side knobs allowing vertical adjustment of the viewing group for a fine fit |
| 9 | Audio | The headset includes an audio system with microphone and speakers |
NOTE
The headset adjustment systems are available in the belt-mounted Console. The visor overlays the most important information related to its operation: magnification level, battery status, active LED spotlight, video and audio recording status.
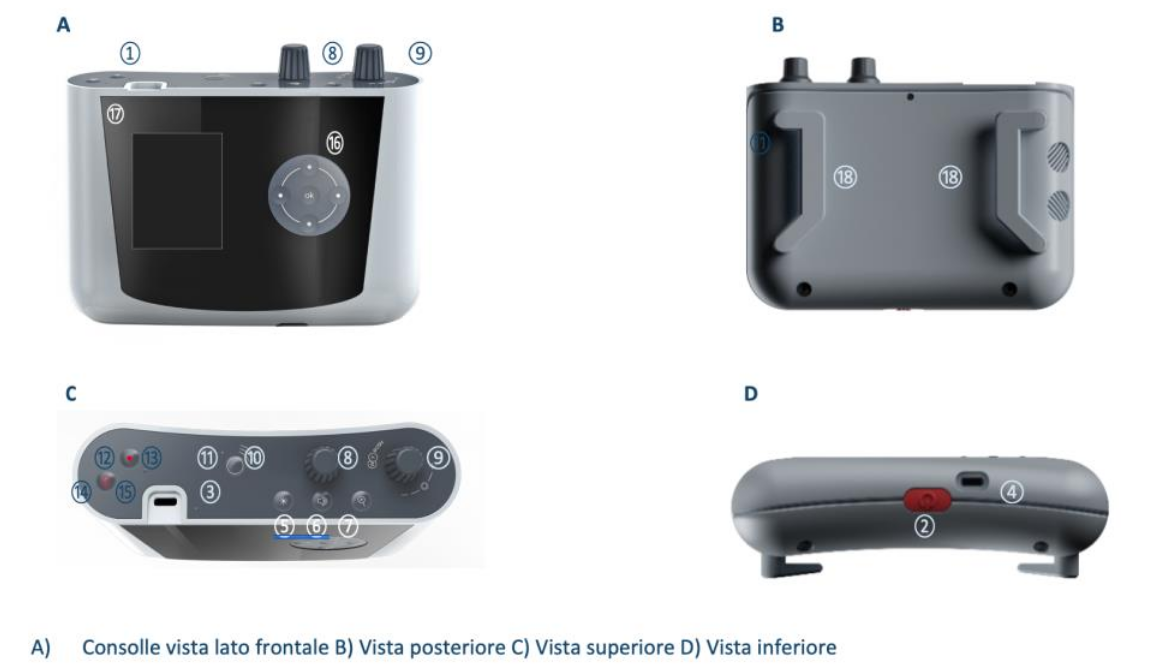
Control Console with Wireless Transmitter
Components
| Group | Name | Description |
|---|---|---|
| 1 | Headset Connection Port | Connector for the cable connection to the Orisview headset. The connector has retention to avoid unwanted disconnections. Take care when unplugging to avoid damage. Do not connect uncertified cables. |
| 2 | ON/OFF and Reset Button | Button to power the device on and off. Pressing it when off powers on the system. Pressing it when on prepares shutdown but requires confirmation on the touchscreen or joystick to complete. This double step avoids accidental shutdowns. Holding the button for more than 8 seconds forces a console reboot. |
| 3 | Power LED | Green LED indicating device status. Solid green during normal operation, blinking during initialization, pulsing during battery charging. |
| 4 | Charging Port | Connector for power supply cable. Low-voltage DC connector for battery charging. Use only the supplied power adapter. |
| 5 | MODE3 Button: Visor/ Shade Brightness | Changes the function of knob⑧. Pressing this button sets knob⑧ to adjust internal headset speaker volume. |
| 6 | MODE2 Button: Speaker Volume | Changes the function of knob⑧. Pressing this button sets knob⑧ to adjust internal headset speaker volume. |
| 7 | MODE1 Button: Magnification Level | Default mode for knob⑧. There are 5 magnification levels displayed as overlay numbers 1 to 5 in the 3D visor. |
| 8 | Multifunction Knob | Pressing this knob cycles the white and yellow LED spotlights ON/OFF. Rotating it clockwise or counterclockwise adjusts brightness. |
| 9 | LED Spotlight Knob and Button | Controls the two LED spotlights on the front with the stereo cameras. Pressing toggles the white and yellow LEDs ON/OFF sequentially. Rotating adjusts brightness. |
| 10 | Video ON/OFF Wireless Transmission Button | Activates video transmission via WiFi. Press and hold until blue LED⑪ lights up. Hold again to stop transmission and turn LED off. |
| 11 | On-Air LED | Blue LED indicates wireless 3D video transmission is active. |
| 12 | A/V Recording Button on SD | Starts local recording of 3D video and ambient audio on the console’s internal SD memory. Red LED⑬ lights when recording is active. |
| 13 | Local Rec LED | Red LED indicating local SD recording is active. |
| 14 | Mute Button | Activates mute to block audio recording or transmission. Can be used in local recording or wireless streaming mode. Red LED⑮ lights when active. |
| 15 | Mute LED | Red LED indicating mute is active. |
| 16 | Joystick | Joystick for interacting with the console’s user interface menus displayed on the LCD screen⑰. |
| 17 | Display | Touchscreen for displaying and managing the console user interface menus. Allows programming system features and checking status. Interaction via touchscreen and/or joystick⑯. |
| 18 | Belt Loops | Loops for attaching a shoulder strap or belt |