Configuration
Warnings
Check the integrity of the medical device and its components upon receipt. If you notice any damage, missing parts, deformation, or signs of impact from transportation, notify the reseller before proceeding with any further operations. All devices are tested and configured by the manufacturer before shipment and delivery to the customer.
Below are the listed and described steps for preparing the device.
The device is designed, manufactured, and tested to meet all relevant standards (see the declaration of conformity), when properly connected and configured.
WARNING
Improper placement, connection, or maintenance voids the warranty.
Configuration Procedures
Preparing Orisview for Use
You have received the package with your Orisview and are ready to get started. Here are the instructions for first-time use.
Remove the Headset, the Console, and the Battery Charging Power Supply from the packaging.

Once you have taken these three components out of the package, follow the instructions below to set them up correctly for use.
Preparing the Headset
Using the protruding tabs, remove the internal and external protective covers from the visor lenses, the shade cover, and the protective covers from the two cameras and LED spotlights.

Before wearing the headset, check that the padding appropriate for your head size is installed on the inner shell (4 sets of pads are included: S, M, L, XL).
Attach the pads to the inner shell using the provided Velcro supports. Put on the headset with both hands, being careful not to touch the lenses or the visor.
Secure the headset to your head by turning the knob located at the back of the inner shell ①.

WARNING
ALWAYS WEAR THE HEADSET WITH BOTH HANDS, BEING VERY CAREFUL NOT TO LIFT IT BY THE CAMERA UNIT OR THE VISOR TO AVOID BREAKAGE AND/OR MISALIGNMENT.
NOTE

BEFORE WEARING THE ORISVIEW HEADSET WITH BOTH HANDS, TURN THE DIAL TO OPEN THE INNER SHELL. ONCE THE HEADSET IS WORN, TURN THE DIAL UNTIL THE SHELL FITS SECURELY ON YOUR HEAD.
NOTE
THE INTERNAL PADS FOR HEAD SIZE ADJUSTMENT CAN BE REPLACED DEPENDING ON FREQUENCY OF USE.
If you wear glasses, you can gently slide the visor forward to wear the headset more comfortably. This will create more space between the glasses and the visor. Once the headset is on, slide the visor back until it is close to the lenses.

If you have the version with inserts and support for prescription lenses, the support can be configured with prescription lenses by your trusted optician and then installed into the designated slots. The prescription lens support is magnetic.

WARNING
Make sure the headset cable is free and not tangled behind the headset.
Preparing the Console
Once the Headset is ready for use and to be connected to the Console, ensure that the Console is also ready. Make sure the battery charge level of the Console, which also powers the headset, is adequate. Although the battery comes with about 30% charge, you should always verify the actual charge level. If the charge level is below 10%, charge the console for at least 30 minutes before using it.
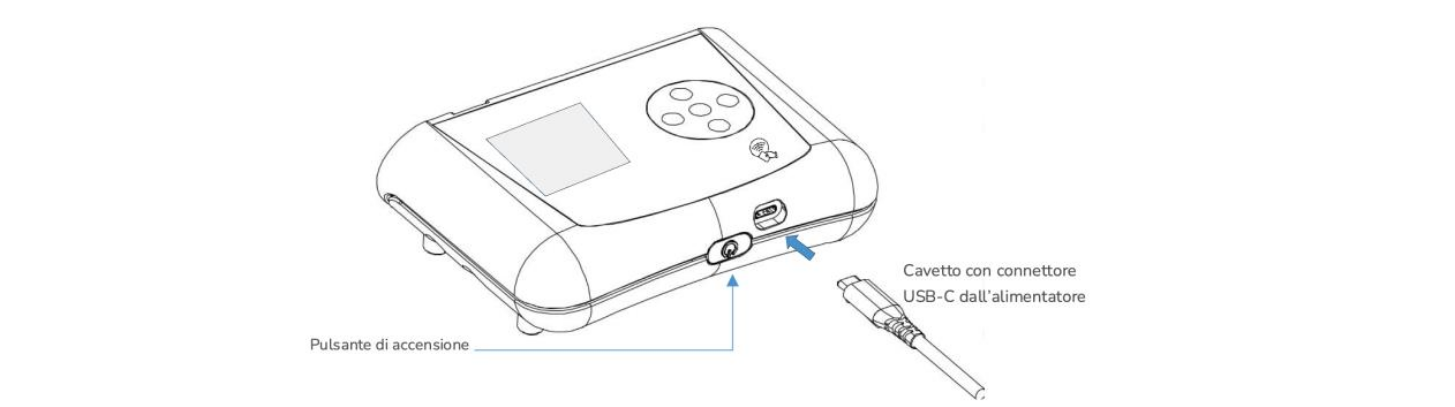
To charge the Console’s battery, use the supplied power adapter and insert the USB-C connector into the port on the underside of the Console, as shown in the image. While charging, the green status LED located near the connector on the top side of the Console (used for the headset connection) will light up and start to pulse slowly.
The battery charge status can be viewed on the touch display. When the display is touched, the battery icon and charge level will appear. With a charge level above 30%, the Console is ready for operation.